


Microsoft Office 365 is the most popular cloud-based emailing service across the world. But as the online hacking is increasing at high pace, users do not feel a hundred percent secure. Therefore, they want to maintain a local copy of their crucial data stored on cloud i.e., O365 account. However, storing Exchange Online mailbox data on the local machine will help in overcoming any type of disaster. A user can secure data by exporting Office 365 emails to PST format including contacts & Calendar. As Microsoft does offer any particular tool for the same so, how to export Office 365 mailboxes to PST file format has become one of the popular searches over the internet. Thus, to solve this query of the O365 user, different methods to export PST from Exchange Online mailbox are shared on this blog.
3 Ultimate Solutions to Export Office 365 Mailboxes to PST File
If a user is looking for a solution of how to export Exchange Online mailboxes to PST / EML, then he/she can go for any of the three different ways listed below:
- Export PST from Office 365 Mailbox via PowerShell Commands
- SysTools Office365 Backup Software
- Export Office 365 emails using eDiscovery PST Export Tool
Method #1: How to Export PST from Office 365 using PowerShell?
One of the possible ways of exporting Office 365 mailboxes to PST format is with the help of PowerShell. Now, to understand this process, let take an example:
- manish@cloudsystool.onmicrosoft.com: It is the mailbox, which a user wants to export emails to PST format
- edwin@.onmicrosoft.com: It is the newly created account in Outlook for export process.
- pavan@cloudsystool.onmicrosoft.com: It is the account that contains all administrative rights to Office 365.
In order to begin the export PST from Office 365 Exchange Online, follow the steps mentioned below:
Step 1: Establish a Connection with Exchange Server using PowerShell
1. To initiate the export process, run the command given below:
“$UserCredential = Get-Credential”
Here, in the Windows PowerShell Credential Request dialog box, you need to enter the Office 365 Exchange Online admin account credentials. So, simply you need to enter the credentials of pavan@cloudsystool.onmicrosoft.com in the displayed window.
2. Then, run the command given below:
“$Session = New-PSSession -ConfigurationName Microsoft.Exchange -ConnectionUri https://outlook.office365.com/powershell-liveid/ -Credential $UserCredential -Authentication Basic –AllowRedirection
3. After that, run the following command:
Import-PSSession $Session
Step 2: Give Complete Access Right to the Mailbox For Export Process Using PowerShell
At this stage, manish@cloudsystool.onmicrosoft.com will get full access to this edwin@123.onmicrosoft.com mailbox. And, for the same, just run the command given below:
Add-MailboxPermission – User edwin@123.onmicrosoft.com -Identity manish@cloudsystool.onmicrosoft.com -AccessRights FullAccess -InheritanceType All
Step 3: Open MS Outlook Using a Newly Created Account
After all this, it’s time to open Microsoft Outlook with new account i.e., edwin@123.onmicrosoft.com. Here, you also need to make sure that manish@cloudsystool.onmicrosoft.com mailbox is there in the left pane of the Outlook mailbox. Always remember, the permissions may take a few seconds or minutes in order to get applied.
Step 4: Verify the Configuration Settings of Outlook
In order to make sure that Outlook is all set to get configured and download emails, follow the steps given below:
- Navigate to File >> Info >> Account Settings option
- After that, click the Account Settings option again and choose the desired account
- Click on the Change button and then check whether this Use Cached Exchange Mode option is selected or not.
Step 5: Use Import/ Export Wizard to Move Emails to PST
- In order to move manish@cloudsystool.onmicrosoft.com mailbox data to PST file, navigate to File –> Open & Export –> Import/ Export option
- Now, select Export to a file from the given list option and click Next
- Here, choose Outlook Data file (.pst) option and again click on the Next button
- After that, select the desired mailbox i.e., manish@cloudsystool.onmicrosoft.com from the displayed emails folders list.
- Click Next and check Include Subfolders option
- Next, Give a new name to the file and storage location where you need to store PST file i.e., c:\tmp\outlook-archive- manish@cloudsystool -20160209.pst
- Choose the desired option under the Options section and click Finish to complete the export process
- Next, if necessary, then enter the password for PST file. Otherwise, leave it blank if it is not against the policy and click on OK
Note: Microsoft Outlook will not work until the migration process is going on.
Step 6: Check Export PST from Office 365 Using PowerShell Accomplished Successfully
In order to be sure about the migration process is finished properly, you need to check the mailbox size on Server and compare it with the size of the resultant PST file. To do this, follow the steps below:
- Simply right-click on the desired mailbox and select Data file properties option
- After that, go to the General tab and click on Folder Size
- Move to Server Data tab and note down Total Size
- Next, go to the properties of resultant PST file and verify if the size of exported PST file matches it with the value given MS Outlook or not.
Step 7: Delete All Assigned Permissions in Above Steps
Now, remove all permissions that assigned to the above steps using PowerShell. For the same, run the commands given below:
Remove-MailboxPermission -User edwin@123.onmicrosoft.com -Identity manish@cloudsystool.onmicrosoft.com -AccessRights FullAccess
Step 8: Close the PowerShell Session
After exporting Office 365 mailboxes to PST successfully, you need to exit the PowerShell session. To do the same, execute the command below:
Remove-PSSession $Session
After running PowerShell command to export mailbox to PST office 365 explained in the above steps, a user successfully gets PST file (contains Emails, contacts, calendar with attachments).
Method #2: How to Export PST from Office 365 Mailbox Using Office 365 Backup Tool?
The manual methods to export Office 365 emails to PST is really hard to perform. A user needs to be a technical expert in order to use it. Moreover, one small wrong step can lead users to permanent data loss. Therefore, one can use a professional solution over manual solution named as SysTools Office 365 Backup Solution. It is a reliable, fast, and simple way to backup and export Exchange Online mailbox to PST / EML file formats. The software is designed in such a smart way that it not only export emails from Office 365 but all other data items also. For example, contacts, tasks, calendars, notes, etc. In addition, a user can use this application in any version of Microsoft Windows OS without any limitation.
Steps to Export Exchange Online Mailboxes to PST / EML file format via Office 365 Backup Tool:
-
Download, Install and Launch SysTools Office 365 Backup Software (demo exe) on the local machine. After that, enter the credentials (username and password) of Exchange Online account, which you want to export Office 365 mailboxes to PST format. Click on Sign in and choose Office 365 Backup option.

- Choose Mails and Documents. Next schedule backup using 5 In-built Scheduler to create the backup. After choosing click on Finish button. This feature is only available On-demand.
-
Now, choose the mailbox items from scanned Office 365 items that you want to export Office 365 mailbox to PST format.
-
Next, you need to choose the output format i.e., PST format to export Office 365 mailbox items. Apply Date filter and other filter. After that, click on the Start button to start the export PST process.
-
Click on the Pause & Resume button and begin or stop the migration process in between. When the process gets completed successfully, a message will pop-up. Simply, click on the OK button and exit the application.

See full working:- https://www.systoolsgroup.com/office365-backup/how-it-works.html
Method #3: How to Export Office 365 to PST Via eDiscovery PST Export Tool?
If a user wants to export Office 365 mailbox to PST format, then he/she can do it using eDiscovery PST export tool. Now, to know properly, how exactly it works, follow the steps mentioned below:
-
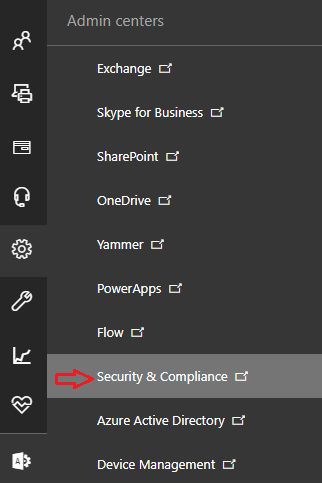
First of all, you have to log in to MS Office 365 service. Go to Exchange Online 365 Admin center in order to export PST from Office 365 admin center
-
Now, widen the Admin Center option and choose the Security & Compliance option
-
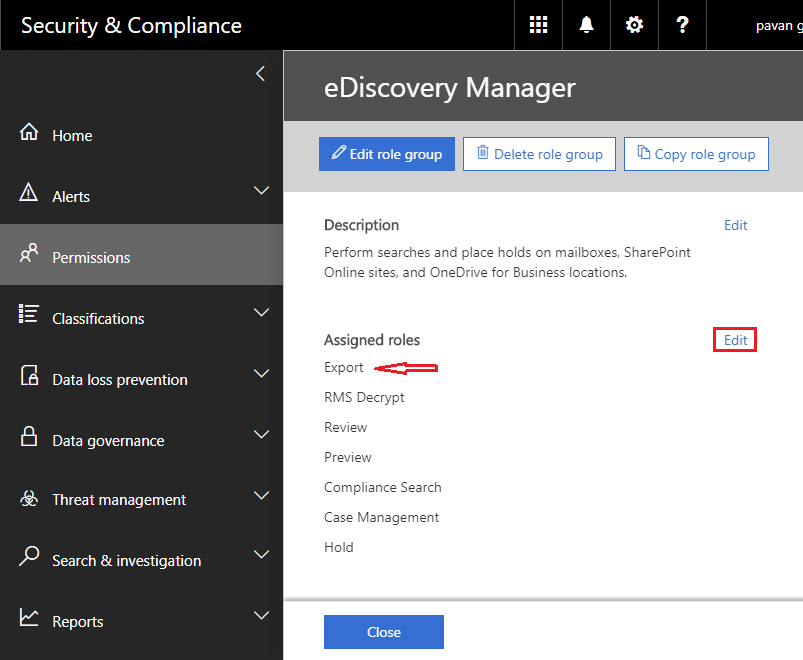
Then, click on the Permission >> + icon in the Security & Compliance center. Here, you have to Edit role group of eDiscovery Manager
-
In the next window, click on the + icon in order to add an account in the eDiscovery Administrator list. Then, click on the Save button and continue
-
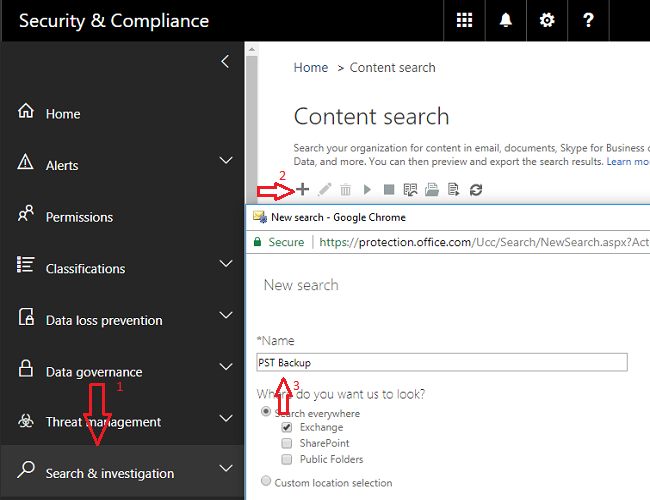
Now, you need to go to the Search & Investigation center. Here, click on the + icon. After that, go to new Content Search Wizard. Enter a name in the Name field >> Next button and proceed further
-
If you want to export all data from Exchange Online mailbox, then simply select Search everywhere option and select Exchange option.
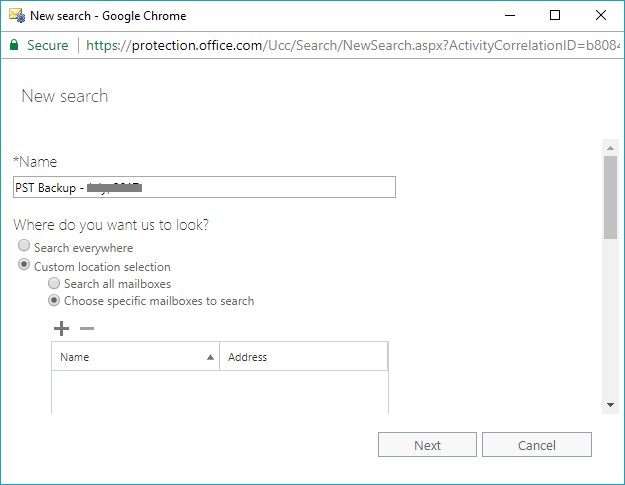
To move only selective data, select Custom location selection option. Click on the + icon.
If you want to export data from Public folders, choose Search all public folders option.
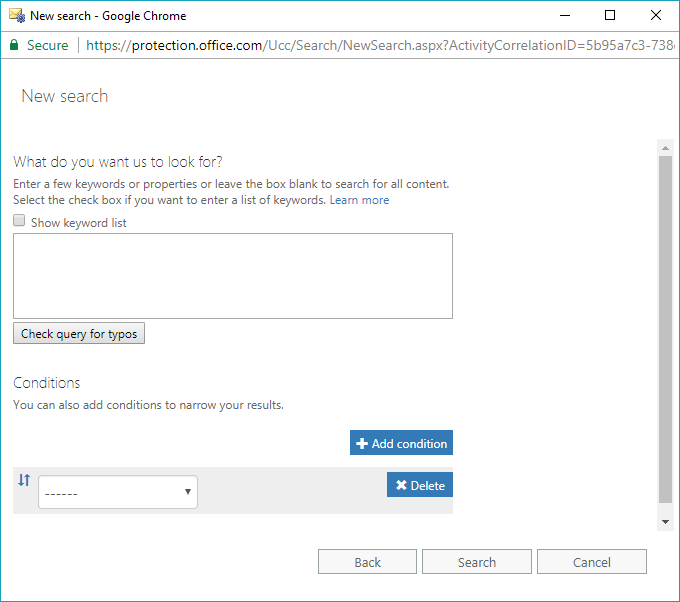
-
In the case of selective data migration from Office 365 mailbox, you can use different filtering options also like logical operators (AND, NOT, OR, etc.) with any particular keyword or phrases. Then, click on the Search option in order to begin the search process
-
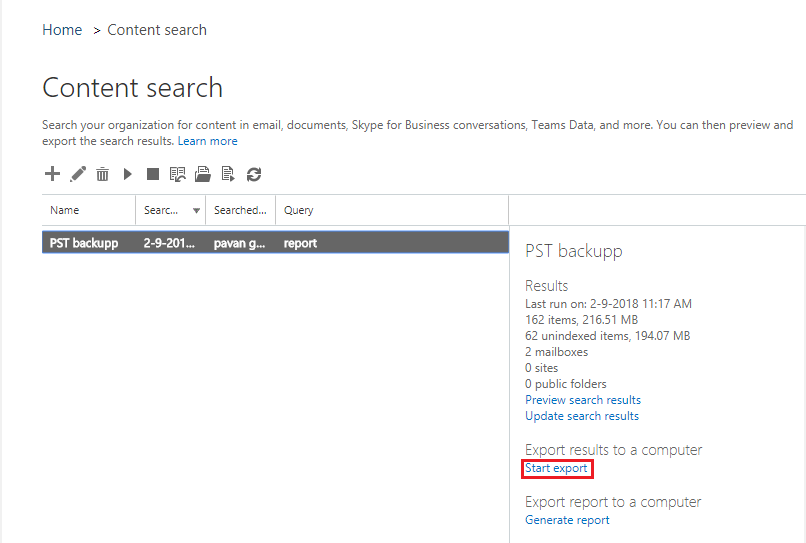
When this search process completed successfully, click on the Start Export button
-
However, if you want, then you can include encrypted files also. When everything is prepared, click on the Start export button
Note: It is advised to go to default option and export Office 365 data to PST format using eDiscovery tool. A separate PST file is created for all selected mailbox.
-
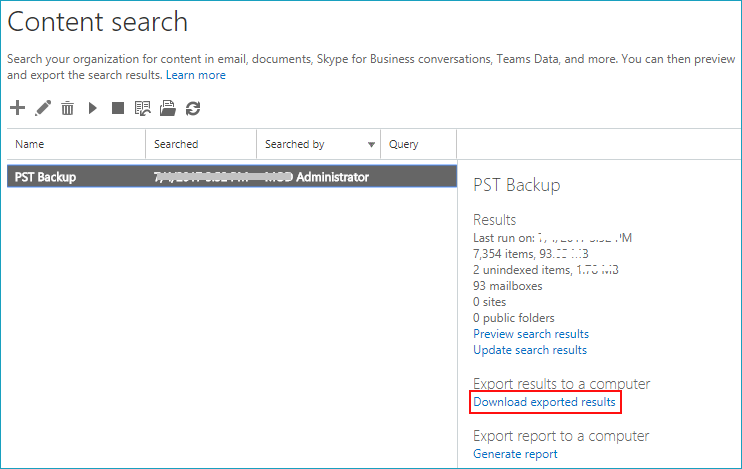
The export PST from Office 365 mailbox is started. Here, it depends upon on your choice that either click on Finish button or on Download exported results button. If you choose Download exported results option, then downloading process and export tools is done at the same time
-
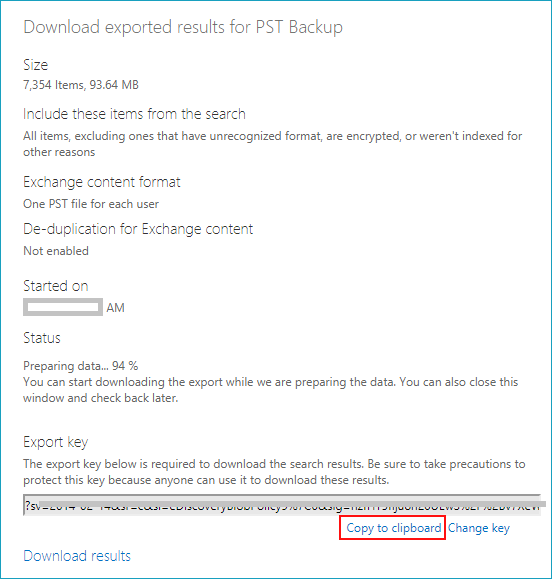
Next, an export key is generated that you have to copy before moving forward
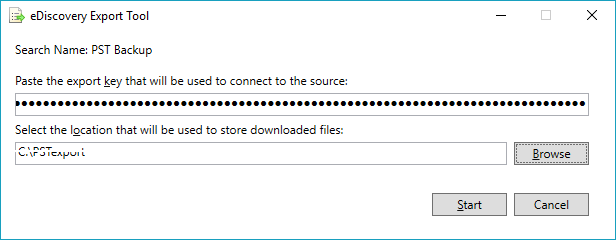
-
At last, eDiscovery PST export tool starts the process. Here, paste the export key, which you have copied in the above step. Choose the destination location in order to save the migrated Office 365 data in PST format. The new experience for how to export office 365 mailboxes to pst using ediscovery.
Limitations of Using eDiscovery Tool
There are some limitations that a user might encounter while using this eDiscovery PST export tool even most of the cases it hangs. A user is not allowed to this method until he/ she has admin rights. Apart from this, to export Office 365 emails eDiscovery searches 10000 mailboxes at a time. Not only this user needs to work on two concurrent searches at a time. Check eDiscovery limitations. Both manual method i.e. eDiscovery and Export PST from Exchange Online with Powershell is quite lengthy and time-consuming while performing. Moreover, it is hard to understand in one go. A user needs to technically strong or takes help of some expert to use this. There are chances that the integrity of data get compromised if any of the above steps go wrong. In such case, SysTools Office 365 Backup Software is the best-recommended solution that speeds up the export procedure.
Ending to Export PST from Office 365 Mailboxes
Exporting data from cloud-based service is not so easy as it seems to be. Same is the case with O365 mailbox data. Users are continuously searching how to export Office 365 mailboxes to PST/ EML file format. After understanding the exact requirement of users, all possible ways to export PST from Office 365 mailboxes are discussed here. A user can choose between them wisely and export Exchange Online mailbox to PST format accordingly.


Kernel Export Office 365 to PST is another excellent Office 365 Backup solution. It helps users to take backup of multiple mailboxes simultaneously. The software is also compatible with all MS Outlook and Office 365 edition.
In just few steps I was able to export Office 365 Mailbox to PST
–Run SysTools Office 365 Exporter tool
–Login with Office 365 Account
–Selected Office 365 mailbox to Export
–Click on Export button >> Filter >> Start
–All my selected Office 365 Mailbox exported to PST file
Thanks for such a great tool in cheap price
What a Great Stuff to export PST from Office 365 Mailbox. Tool used was awesome. I was able to restore multiple PST file to Office 365 Mailbox.
Thanks for discussing a great method to create a backup of office 365, but here I also recommend you, use a third party tool by which you can easily Export your all Mailbox data into PST format. There are many tools are available and MailsDaddy Office 365 Backup Tool Is one of them. with this tool, you can create backup into PST or other formats like Mbox, MSG, and EML etc.